使用Redux做了一个简单的ToDoList待办事项列表,具体如下
这个例子也是源于Redux作者Dan Abramov的视频demo
还要特别说明一下
我还没有使用react-redux库进行解耦(可能以后加)
也没有拆分成多个文件等等优化
为了单纯的练习redux
适合初步学习redux的同学
本人学疏才浅,发现可以优化的地方或者问题还请大家指正,谢谢
功能样式
样子就是这样的
在输入框输入待办事项
功能很简单
鼠标点击Add或者键盘按下Enter输出
ShowAll显示全部待办事项
ShowActive显示未完成的待办事项(未划掉的)
ShowCrossed显示已完成的待办事项(划掉的)
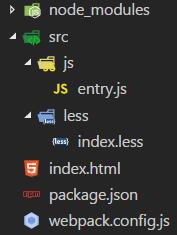
配置文件
使用Webpack构建的文件夹如下
webpack.config.js配置文件
module.exports = {
 entry: {
 index: './src/js/entry.js'
 },
 output: {
 path: './static/dist/',
 publicPath: 'http://localhost:8080/static/dist/',
 filename: '[name].js'
 },
 module: {
 loaders: [
 {
 test: /\.js$/,
 loader: 'babel',
 exclude:/node_modules/,
 query: {
 presets: ['react', 'es2015']
 }
 },
 {
 test: /.less$/,
 loader: 'style!css!less'
 }
 ]
 }
}
package.json的依赖项
{
 "name": "react-demo",
 "version": "1.0.0",
 "description": "",
 "main": "webpack.config.js",
 "scripts": {
 "test": "echo \"Error: no test specified\" && exit 1",
 "diy": "webpack-dev-server --progress --colors --devtool sourcemap"
 },
 "author": "Payson",
 "license": "ISC",
 "devDependencies": {
 "babel-core": "^6.22.1",
 "babel-loader": "^6.2.10",
 "babel-preset-es2015": "^6.22.0",
 "babel-preset-react": "^6.22.0",
 "css-loader": "^0.26.1",
 "jquery": "^3.1.1",
 "less": "^2.7.2",
 "less-loader": "^2.2.3",
 "react": "^15.4.2",
 "react-dom": "^15.4.2",
 "react-redux": "^5.0.2",
 "redux": "^3.6.0",
 "style-loader": "^0.13.1",
 "webpack": "^1.14.0",
 "webpack-dev-server": "^1.16.2"
 }
}
html文件
<!DOCTYPE html>
<html lang="en">
<head>
 <meta charset="UTF-8">
 <title>React</title>
</head>
<body>
 <div id="root"></div>
 <script src="http://localhost:8080/static/dist/index.js"></script>
</body>
</html>
脚本文件
没有细拆文件
直接写在入口文件entry.js了
注释就写在代码里了
require('../less/index.less'); //行间样式受限制不能添加伪类伪元素,所以还是添加了less(css)控制样式
import React from 'react';
import {Component} from 'react'
import ReactDom from 'react-dom';
import {createStore, combineReducers} from 'redux';

class ToDoList extends Component {
 addHandler(){ //添加待办事项的listener
 let Inp = this.refs.Inp; //获取真实DOM的输入value
 if(!Inp.value){ //如果没有输入值,直接返回
 return;
 }
 store.dispatch( //dispatch一个添加项目的action,并传入输入数据
 {
 type: 'ADD_ITEM',
 newItem: Inp.value
 }
 )
 Inp.value = ''; //提交后,清空输入
 Inp.focus(); //重置输入焦点
 }
 toggleHandler(item){ //Action Creator:负责提交切换中划线的action
 store.dispatch(
 {
 type: 'TOGGLE_ITEM',
 changeID: item.ID
 }
 );
 }
 showAllHandler(){ //Action Creator:负责showAll的action
 store.dispatch(
 {
 type: 'SET_FILTER',
 filter: 'SHOW_ALL'
 }
 );
 }
 showActiveHandler(){ //Action Creator:负责showActive的action
 store.dispatch(
 {
 type: 'SET_FILTER',
 filter: 'SHOW_ACTIVE'
 }
 );
 }
 showCrossedHandler(){ //Action Creator:负责showCrossed的action
 store.dispatch(
 {
 type: 'SET_FILTER',
 filter: 'SHOW_CROSSED'
 }
 );
 }
 render(){ //渲染结构样式
 let _this = this; //缓存this
 let state = store.getState(); //缓存store的快照--state
 let {list, option} = state; //解构赋值获取两个子state
 //list是一个数组,内部数组元素是对象表示每一个列表项
 //option是一个字符串,表示当先选择的选项
 switch(option){ //通过判断当前的option字符串来决定是否过滤list数组
 case 'SHOW_ACTIVE':
 list = list.filter(function(item){
 return !item.del;
 });
 break;
 case 'SHOW_CROSSED':
 list = list.filter(function(item){
 return item.del;
 });
 break;
 }
 document.body.addEventListener('keydown', function(e){
 if(e.which == 13){
 _this.addHandler();
 }
 }); //绑定键盘enter事件
 return (
 <div>
 <input type="text" ref="Inp"/> //设置ref属性为了获取真实DOM节点
 <button onClick={_this.addHandler.bind(_this)}>Add</button>
 <ul className="option">
 <li onClick={_this.showAllHandler.bind(_this)}>
 <span style={{textDecoration: option!='SHOW_ALL' ? 'underline' : 'none'}}>ShowAll</span>
 </li>
 <li onClick={_this.showActiveHandler.bind(_this)}>
 <span style={{textDecoration: option!='SHOW_ACTIVE' ? 'underline' : 'none'}}>ShowActive</span>
 </li>
 <li onClick={_this.showCrossedHandler.bind(_this)}>
 <span style={{textDecoration: option!='SHOW_CROSSED' ? 'underline' : 'none'}}>ShowCrossed</span>
 </li> //判断option字符串来决定三个选项的样式
 </ul>
 <ul className="list">
 {
 list.map(function(item, index){ //通过list数组map映射为虚拟DOM节点
 return <li key={index}>
 <span style={{textDecoration: item.del ? 'line-through': 'none'}}
 onClick={_this.toggleHandler.bind(_this, item)}>{item.item}</span>
 </li>
 })
 }
 </ul>
 </div>
 )
 }
}
const list = (state = [], action) => { //list-reducer
 switch(action.type){
 case 'ADD_ITEM':
 return [
 ...state,
 {
 item: action.newItem, //列表项内容
 ID: state.length, //列表项ID
 del: false //列表项是否已划掉
 }
 ];
 case 'TOGGLE_ITEM':
 return state.map((item)=>{
 return Object.assign({},item,{
 del: action.changeID == item.ID ? !item.del : item.del
 });
 });
 default:
 return state;
 }
}
const option = (state = 'SHOW_ALL', action) => { //option-reducer
 switch(action.type){
 case 'SET_FILTER':
 return action.filter;
 default:
 return state;
 }
}
const reducer = combineReducers({list, option}); //利用redux库API-combineReducers()合并reducer
const store = createStore(reducer); //利用redux库API-createStore()创建store
const render = () => { //自定义的渲染函数
 ReactDom.render(
 <ToDoList/>,
 document.getElementById('root')
 );
}
store.subscribe(render); //绑定render函数,每次state更新时执行
render(); //首次渲染
样式文件
index.less文件加一些样式控制
.option {
 list-style-type: none;
 padding: 0;
 margin-top: 5px;
 font-size: 13px;
 li {
 float: left;
 margin-right: 15px;
 span {
 cursor: pointer;
 font-weight: bold;
 }
 }
 &::after {
 content: '';
 display: block;
 clear: both;
 }
}
.list {
 li {
 span {
 &:hover {
 color: #f40;
 cursor: pointer;
 }
 &::selection {
 color: #000;
 background-color: #fff;
 }
 }
 }
}
以上就是【React+Redux实现简单的待办事项列表ToDoList】的全部内容了,欢迎留言评论进行交流!