实现代码如下:
package swt_jface.demo9;
import org.eclipse.swt.SWT;
import org.eclipse.swt.custom.ViewForm;
import org.eclipse.swt.layout.FillLayout;
import org.eclipse.swt.widgets.Display;
import org.eclipse.swt.widgets.Label;
import org.eclipse.swt.widgets.Shell;
public class ViewFormExample {
Display display = new Display();
Shell shell = new Shell(display);
public ViewFormExample() {
shell.setLayout(new FillLayout());
final ViewForm viewForm = new ViewForm(shell, SWT.BORDER);
Label label = new Label(viewForm, SWT.NULL);
label.setText("Top center");
viewForm.setTopCenter(label);
shell.setSize(400, 200);
shell.open();
while (!shell.isDisposed()) {
if (!display.readAndDispatch()) {
display.sleep();
}
}
display.dispose();
}
public static void main(String[] args) {
new ViewFormExample();
}
}
用ViewForm做布局调整
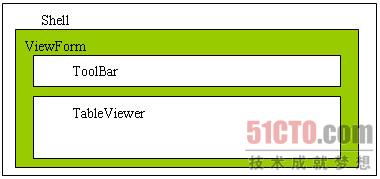
在上一步创建好ActionGroup中的Action后,接下来就是要在界面中加上工具栏。先要将布局用ViewForm类来调整一下,ViewForm也是继承自Composite的一个容器。原先表格是建立在Shell之上的,现在要在Shell上再插入一个ViewForm容器,以它为基座将工具栏和表格创建于其中,如图14.9所示。
将原主程序中的open()方法修改如下,其他代码不变:
shell.setLayout(new FillLayout()); ViewForm viewForm = new ViewForm(shell, SWT.NONE); //布局基座ViewForm viewForm.setLayout(new FillLayout()); final TableViewer tv = new TableViewer(viewForm, SW… //父容器由shell改为viewForm //……和上一节相同的代码(省略) //创建工具栏 ToolBar toolBar = new ToolBar(viewForm, SWT.FLAT); // 创建一个ToolBar容器 ToolBarManager toolBarManager = new ToolBarManager(toolBar); // 创建一个toolBar的管理器 actionGroup.fillActionToolBars(toolBarManager); //将Action通过toolBarManager注入ToolBar中 // 设置表格和工具栏在布局中的位置 viewForm.setContent(tv.getControl()); // 主体:表格 viewForm.setTopLeft(toolBar); // 顶端边缘:工具栏 shell.open(); |
 |
| 图14.9 布局示意图 |
以上就是【SWT(JFace)体验之ViewForm的使用】的全部内容了,欢迎留言评论进行交流!