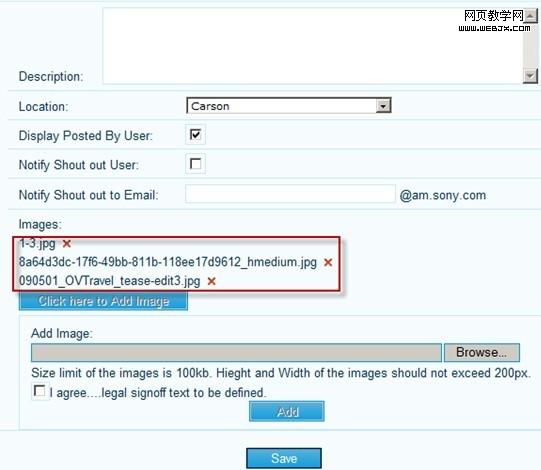
其中红色方框内的内容是通过脚本在页面上动态创建的,将用户在客户端所选文件的文件名动态添加到一个div里,同时在这个div中放一个隐藏的input type='file'的标签,它的value为用户所选文件的路径,然后在div中放置一个img,添加onmouseover和onmouseout事件为图片增加了一些鼠标滑动时的效果,onclick事件用来响应用户点击img时删除对应的文件。看一下代码中的具体实现。
实现代码如下:
<%@ Page Language="C#" AutoEventWireup="true" CodeBehind="Default.aspx.cs" Inherits="WebApplication1._Default" %>
<!DOCTYPE html PUBLIC "-//W3C//DTD XHTML 1.0 Transitional//EN" "http://www.w3.org/TR/xhtml1/DTD/xhtml1-transitional.dtd">
<html xmlns="http://www.w3.org/1999/xhtml">
<head runat="server">
<title></title>
<script src="MultiAffix.js" type="text/javascript"></script>
<script type="text/javascript">
var controlName = 1; // This variable is for the dynamic file controls's name.
function addImg(targetElement, savestatsElement, oldimgElement) {
var browseimgElement = $get("browseimg");
var arr = browseimgElement.getElementsByTagName('input');
if (arr.length == 0 || arr[0].value.length == 0) {
alert('No file inputs.');
return;
}
var oldbrowser = arr[0];
var filename = getfilename(oldbrowser.value);
if (!validateimgtype(oldbrowser.value)) return;
if (!validateimgcount(targetElement, 3)) return;
var imgtitles = savestatsElement.value + oldimgElement.value;
if (validateimgexist(filename, imgtitles)) { alert('You have already added this image!'); return; }
if (oldbrowser != undefined) {
var newbrowser = oldbrowser.cloneNode(true);
newbrowser.value = '';
var newfile = document.createElement('div');
newfile.innerHTML = filename + ' ';
// Create a button element for delete the image.
var newfileimgbutton = document.createElement('img');
newfileimgbutton.src = 'ShoutOut_Close.gif';
newfileimgbutton.alt = 'Delete';
newfileimgbutton.onclick = function() {
this.parentNode.parentNode.removeChild(this.parentNode);
savestatsElement.value = updatehiddenimgs(filename, savestatsElement.value);
}
newfileimgbutton.onmouseover = function() {
this.src = 'ShoutOut_Close_rollover.gif';
}
newfileimgbutton.onmouseout = function() {
this.src = 'ShoutOut_Close.gif';
}
browseimgElement.replaceChild(newbrowser, oldbrowser);
oldbrowser.name = ++controlName;
oldbrowser.style.display = 'none';
newfile.appendChild(oldbrowser);
newfile.appendChild(newfileimgbutton);
targetElement.appendChild(newfile);
$get("chkAgree").checked = false;
$get("btAdd").disabled = true;
savestatsElement.value += filename + '|';
}
}
</script>
</head>
<body>
<form id="form1" runat="server">
<asp:ScriptManager ID="ScriptManager1" runat="server">
</asp:ScriptManager>
<div>
<div>
Description:
<asp:TextBox ID="tbDescription" MaxLength="2000" runat="server" TextMode="MultiLine"></asp:TextBox>
</div>
<div>
Location:
<asp:DropDownList ID="ddlLocation" runat="server">
</asp:DropDownList>
</div>
<div>
Display Posted By User:
<asp:CheckBox ID="chkPostedByUser" Checked="true" runat="server" />
</div>
<div>
Notify Shout out User:
<asp:CheckBox ID="chkNotifyUser" runat="server" />
</div>
<div>
Notify Shout out to Email:
<asp:TextBox ID="tbShoutoutToEmail" MaxLength="25" runat="server"></asp:TextBox>
</div>
<div>
Images:
<div id="saveshoutoutimgs" runat="server">
</div>
<input id="btAddImage" type="button" onclick="$get('saveshoutoutaddimgs').style.display='block';this.disabled=true;"
value="Click here to Add Image" />
</div>
<div id="saveshoutoutdetailshowimg">
<div id="saveshoutoutaddimgs" style="display: none;">
<div>
Add Image:</div>
<div id="browseimg">
<input type="file" />
</div>
<div>
Size limit of the images is 100kb. Hieght and Width of the images should not exceed
200px.</div>
<div>
<input id="chkAgree" type="checkbox" onclick="$get('btAdd').disabled=!this.checked;" />I
agree.legal signoff text to be defined.
</div>
<div>
<input id="btAdd" disabled="disabled" type="button" value="Add" runat="server" />
</div>
</div>
</div>
</div>
<asp:TextBox ID="tbImgs" runat="server" Text="|" Style="display: none;"></asp:TextBox>
<asp:TextBox ID="tbOldImgs" runat="server" Text="|" Style="display: none;"></asp:TextBox>
</form>
</body>
</html>
实现代码如下:
protected void Page_Load(object sender, EventArgs e)
{
string script = string.Format("addImg($get('{0}'), $get('{1}'), $get('{2}'));",
this.saveshoutoutimgs.ClientID,
this.tbImgs.ClientID,
this.tbOldImgs.ClientID);
this.btAdd.Attributes.Add("onclick", script);
}
代码建立在Ajax.net基础之上,环境是Visual Studio 2008 + Windows 2003,测试通过!
简单做一下说明:
1. <div id="saveshoutoutimg" runat="server"/>用来存放动态添加的文件相关标签。
2. btAddImage被点击后自身将被disabled掉,然后显示saveshoutoutaddimgs整个div。
3. 在saveshoutoutaddimgs中用户可以完成文件的选取和确认操作,chkAgree用来enable btAdd按钮。
4. 当用户点击btAdd时,触发onclick事件,该事件在code-behind的Page_Load方法中注册,因为脚本中涉及到使用服务端控件的ClientID属性,这样写比较方便。
5. 客户端函数addImg用来完成动态DOM的添加操作,它接收三个参数,第一个参数targetElement表示存放动态DOM的宿主DIV,第二个参数savestatsElement表示用于保存已添加文件信息的隐藏文本框,第三个参数oldimgElement表示用于保存在编辑状态下用户上一次上传的文件信息隐藏文本框。基本思路是复制browseimg下的input type="file"标签,然后将动态生成的DOM添加到saveshoutoutimgs下,并同时附加了一些事件。
6. tbImgs隐藏文本框用来保存用户已选文件的信息,以"|文件名1|文件名2|文件名3|..."的格式存放;tbOldImgs隐藏文本框中的值在编辑状态下才会得到,其中保存了用户上一次所上传文件的信息,存储格式与tbImgs相同。
7. 在编辑状态下,在服务端向saveshoutoutimgs标签添加与addImg脚本函数所生成的动态DOM相同的标签,并同时往tbOldImgs隐藏文本框中写入文件信息。我在这里写了一个示例,读者可以自己完善代码用以验证。在显示文件时我在文件的名称上添加了一个链接,这个链接所指向的页面用于输出图片,如通过得到的图片ID在数据库中检索图片的二进制数据然后Write到页面上。ImageEntity为自定义Image对象的实体类,用以存储图片文件的相关信息。
实现代码如下:
public void SetImages(List<ImageEntity> images)
{
if (images.Count > 0)
{
this.tbOldImgs.Text = "|";
foreach (ImageEntity image in images)
{
HtmlGenericControl imgDiv = new HtmlGenericControl("Div");
HtmlAnchor imgAnchor = new HtmlAnchor();
imgAnchor.HRef = string.Format("Thumbnail.aspx?isthumbnail=false&basecommentid={0}&imagetitle={1}",
image.ID.ToString(), image.Title);
imgAnchor.Target = "_blank";
imgAnchor.Title = image.Title;
imgAnchor.InnerHtml = image.Title + " ";
HtmlImage imgButton = new HtmlImage();
imgButton.Src = "ShoutOut_Close.gif";
imgButton.Alt = "Delete";
imgButton.Attributes["onclick"] = string.Format("this.parentNode.parentNode.removeChild(this.parentNode);$get('{0}').value = updatehiddenimgs('{1}',$get('{0}').value);",
this.tbOldImgs.ClientID, image.Title);
imgButton.Attributes["onmouseover"] = "this.src='ShoutOut_Close_rollover.gif'";
imgButton.Attributes["onmouseout"] = "this.src='ShoutOut_Close.gif'";
imgDiv.Controls.Add(imgAnchor);
imgDiv.Controls.Add(imgButton);
this.saveshoutoutimgs.Controls.Add(imgDiv);
this.tbOldImgs.Text += image.Title + "|";
}
}
}
public class ImageEntity
{
public ImageEntity()
{
}
public ImageEntity(int id, string title, Byte[] imageBlob, string type)
{
ID = id;
Title = title;
ImageBlob = imageBlob;
Type = type;
}
public int ID { get; set; }
public string Title { get; set; }
public string Type { get; set; }
public Byte[] ImageBlob { get; set; }
}
有一个问题需要注意,当保存编辑状态下的数据时,在服务端需要重新删除原有图片然后再重新添加图片,对于用户未在客户端修改的图片,则需要在保存数据前通过tbOldImgs隐藏域中的相关信息重新检索得到图片数据,然后重新保存图片。例如编辑状态下得到A、B、C三张图片,用户删除了图片C,添加了图片D,则保存时在服务端这样操作:先通过tbOldImgs隐藏域得到剩余的旧图片信息(即图片A和图片B),从数据库中检索出这些图片的数据,保存前先删除与该条数据相关的所有已上传图片,然后与得到的新图片(即图片D)一并存入数据库中。
还有一点就是,如果想要实现上传图片前判断图片文件的大小,必须通过C#代码来实现,这个不能简单地通过js脚本来实现,因为涉及到浏览器对客户端文件访问权限的限制。也就是说,需要将页面预先提交到服务器,判断完成后通知客户端接下来的行为,为了避免页面提交时客户端原有的状态丢失,可以采用隐藏iFrame的方式提交页面,这个在文章的一开始我已经提到过了。
总之,在Web中实现多附件上传必须借助于javascript来动态创建DOM,编辑状态下可以在服务端将事先处理好的DOM添加到页面上,并同时附件脚本事件,在服务端代码和客户端代码之间注意保存各个控件的状态。
以上就是【ASP.NET 多附件上传实现代码】的全部内容了,欢迎留言评论进行交流!