rsync默认情况下端口都是873,如果服务器开启了防火墙需要打开对应的端口。
window下面开启873端口的方法
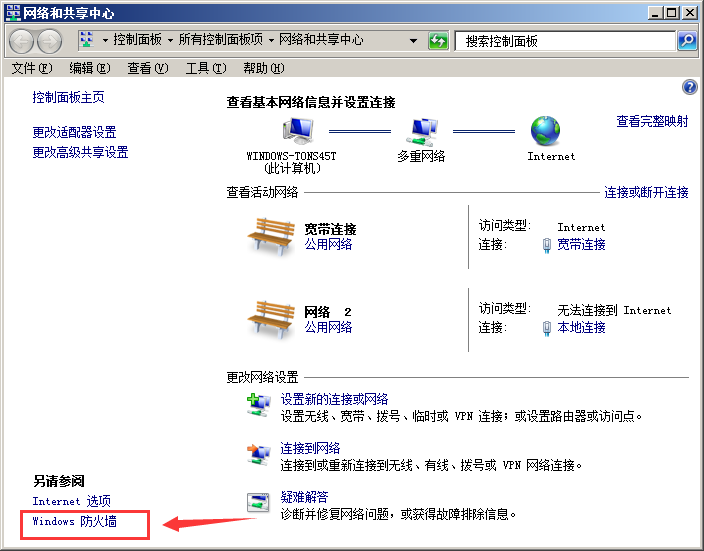
我的桌面 》网络 》右键 》属性 》左下角 防火墙
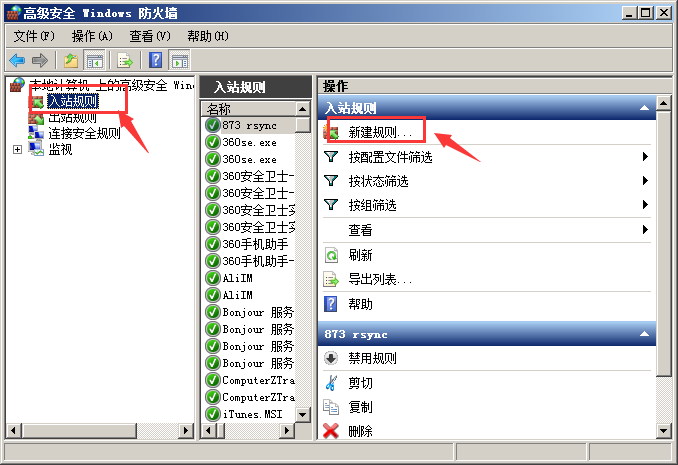
入站规则 》 新建规则
打开如下窗口 选择 ”端口“
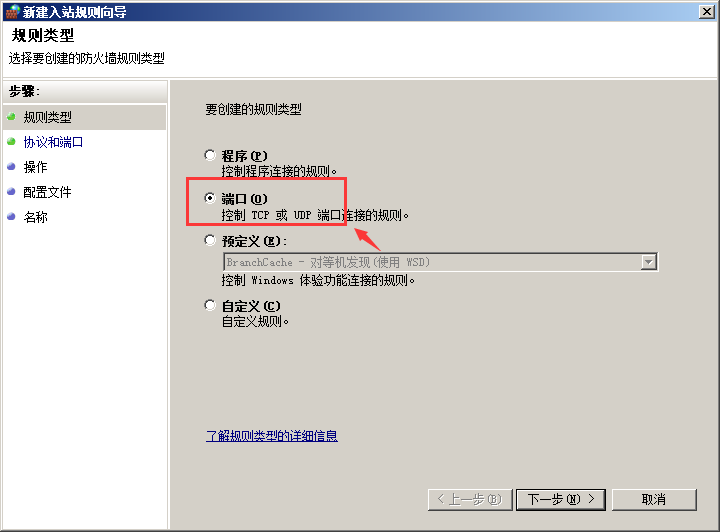
下一步
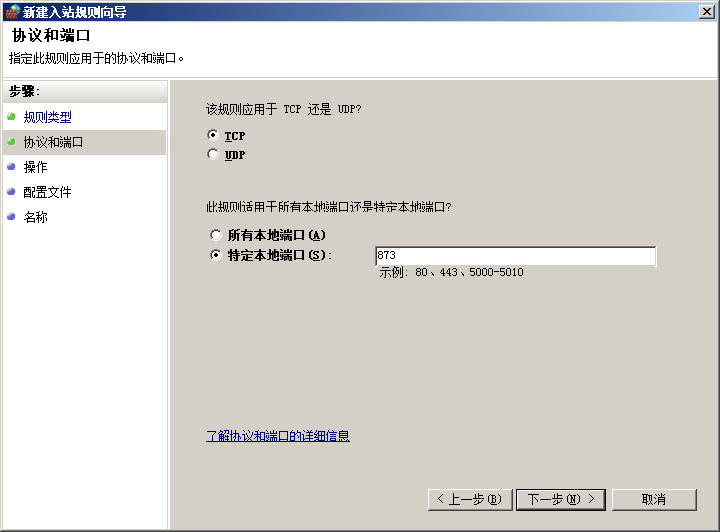
特定本地端口 收入 873
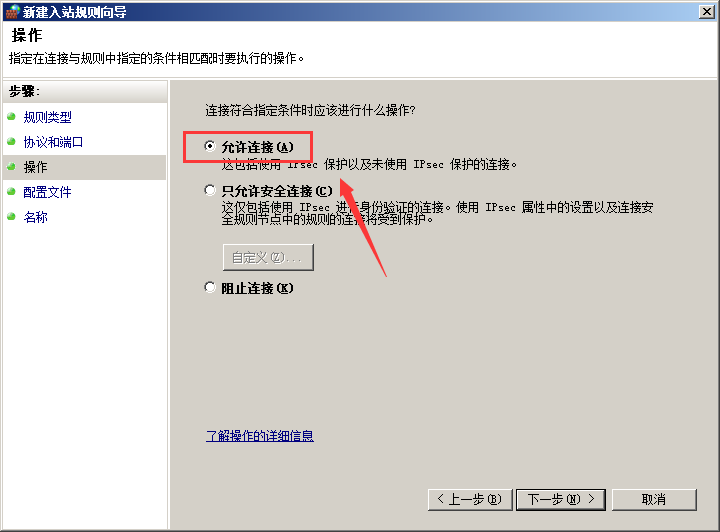
肯定是允许连接

默认就是三个全部选择
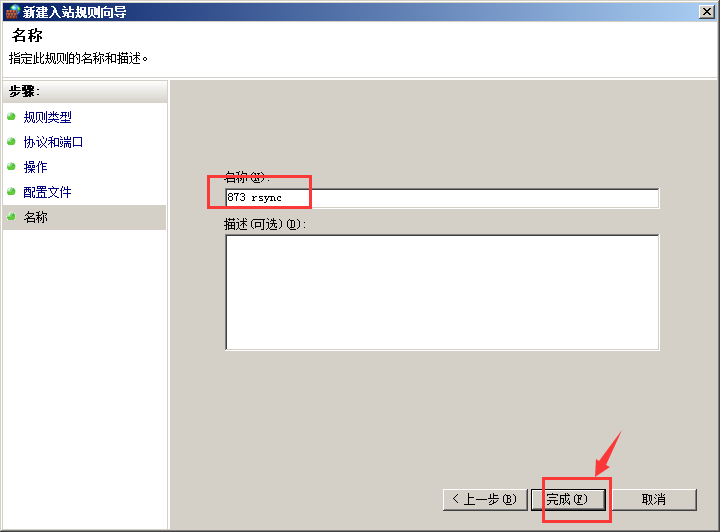
起个名字方便这个是做什么用的
好了,windows下的设置方法就ok了
LINUX 如何开放端口和关闭端口
iptables -A INPUT -ptcp --dport 873-j ACCEPT
一、查看哪些端口被打开 netstat -anp
二、关闭端口号:iptables -A INPUT -p tcp --drop 端口号-j DROP
iptables -A OUTPUT -p tcp --dport 端口号-j DROP
三、打开端口号:iptables -A INPUT -ptcp --dport 端口号-j ACCEPT
四、以下是linux打开端口命令的使用方法。
nc -lp 23 &(打开23端口,即telnet)
netstat -an | grep 23 (查看是否打开23端口)
五、linux打开端口命令每一个打开的端口,都需要有相应的监听程序才可以
#允许所有IP对本机80端口的访问
iptables -I INPUT -p tcp –dport 80 -j ACCEPT
iptables -I INPUT -p udp –dport 80 -j ACCEPT
#提高本地数据包的优先权:放在第1位
iptables -t mangle -A OUTPUT -p tcp -m tcp –dport 22 -j MARK –set-mark 1
iptables -t mangle -A OUTPUT -p tcp -m tcp –dport 22 -j RETURN
iptables -t mangle -A OUTPUT -p icmp -j MARK –set-mark 1
iptables -t mangle -A OUTPUT -p icmp -j RETURN
#提高tcp初始连接(也就是带有SYN的数据包)的优先权是非常明智的:
iptables -t mangle -A PREROUTING -p tcp -m tcp –tcp-flags SYN,RST,ACK SYN -j MARK –set-mark 1
iptables -t mangle -A PREROUTING -p tcp -m tcp –tcp-flags SYN,RST,ACK SYN -j RETURN
#提高ssh数据包的优先权:放在第1类,要知道ssh是交互式的和重要的,不容待慢哦
iptables -t mangle -A PREROUTING -p tcp -m tcp –dport 22 -j MARK –set-mark 1
iptables -t mangle -A PREROUTING -p tcp -m tcp –dport 22 -j RETURN
#封锁55.55.55.55对本机所有端口的访问,暂不使用,我的注释掉了。
iptables -I INPUT -s 55.55.55.55 -j DROP
#禁止55.55.55.55对80端口的访问
iptables -I INPUT -s 55.55.55.55 -p TCP –dport 80 -j DROP
rsync更改端口后的同步办法
rsync有两种常用的认证方式,一种为rsync-daemon方式,另外一种则是ssh。
在一些场合,使用rsync-daemon方式会比较缺乏灵活性,ssh方式则成为首选。但是今天实际操作的时候发现当远端服务器的ssh默认端口被修改后,rsync时找不到一个合适的方法来输入对方ssh服务端口号。
在查看官方文档后,找到一种方法,即使用-e参数。
-e参数的作用是可以使用户自由选择欲使用的shell程序来连接远端服务器,当然也可以设置成使用默认的ssh来连接,但是这样我们就可以加入ssh的参数了。
具体语句写法如下:
rsync -e 'ssh -p 1234' username@hostname:SourceFile DestFile
其他参数完全按照rsync的规定格式加入即可。
上面语句中比较新鲜的地方就是使用了单引号,目的是为了使引号内的参数为引号内的命令所用。没有引号的话系统就会识别-p是给rsync的一个参数了。我的描述可能比较烂,详情可以参考rsync官方描述:
Command-line arguments are permitted in COMMAND provided that COMMAND is presented to rsync as a single argument. You must use spaces (not tabs or other whitespace) to separate the command and args from each other, and you can use single- and/or double-quotes to preserve spaces in an argument (but not backslashes). Note that doubling a single-quote inside a single-quoted string gives you a single-quote; likewise for double-quotes (though you need to pay attention to which quotes your shell is parsing and which quotes rsync is parsing).
下面是rsync配置过程中常遇到的一些文件,大家可以可以参考一下
一般使用默认端口的话, 在服务端的启动命令为:
/usr/bin/rsync --address=192.168.1.23 --daemon
如果在客户端需要换另外的端口侦听, 则使用
/usr/bin/rsync --address=172.18.16.89 --port=8081 --daemon
客户端命令:
/usr/bin/rsync -vzrc --progress --bwlimit=300 /usr/local/tomcat/webapps/.gif 172.18.16.89::appLogo/
rsync: failed to connect to 172.18.16.89: Connection refused (111)
rsync error: error in socket IO (code 10) at clientserver.c(107) [sender=2.6.8]
此时在客户端也必须指定端口, 不然会报错。
改为
/usr/bin/rsync -vzrc --port=8081 --progress --bwlimit=300 /usr/local/tomcat/webapps/.gif 172.18.16.89::appLogo/
就OK
三、FAQ
Q:如何通过ssh进行rsync,而且无须输入密码?
A:可以通过以下几个步骤
1. 通过ssh-keygen在server A上建立SSH keys,不要指定密码,你会在~/.ssh下看到identity和identity.pub文件
2. 在server B上的home目录建立子目录.ssh
3. 将A的identity.pub拷贝到server B上
4. 将identity.pub加到~[user b]/.ssh/authorized_keys
5. 于是server A上的A用户,可通过下面命令以用户B ssh到server B上了
e.g. ssh -l userB serverB
这样就使server A上的用户A就可以ssh以用户B的身份无需密码登陆到server B上了。
Q:如何通过在不危害安全的情况下通过防火墙使用rsync?
A:解答如下:
这通常有两种情况,一种是服务器在防火墙内,一种是服务器在防火墙外。
无论哪种情况,通常还是使用ssh,这时最好新建一个备份用户,并且配置sshd仅允许这个用户通过RSA认证方式进入。
如果服务器在防火墙内,则最好限定客户端的IP地址,拒绝其它所有连接。
如果客户机在防火墙内,则可以简单允许防火墙打开TCP端口22的ssh外发连接就ok了。
Q:我能将更改过或者删除的文件也备份上来吗?
A:当然可以:
你可以使用如:rsync -other -options -backupdir = ./backup-2000-2-13 ...这样的命令来实现。
这样如果源文件:/path/to/some/file.c改变了,那么旧的文件就会被移到./backup-2000-2-13/path/to/some/file.c,这里这个目录需要自己
手工建立起来
Q:我需要在防火墙上开放哪些端口以适应rsync?
A:视情况而定
rsync可以直接通过873端口的tcp连接传文件,也可以通过22端口的ssh来进行文件传递,但你也可以通过下列命令改变它的端口:
rsync --port 8730 otherhost::
或者
rsync -e 'ssh -p 2002' otherhost:
Q:我如何通过rsync只复制目录结构,忽略掉文件呢?
A:rsync -av --include '*/' --exclude '*' source-dir dest-dir
Q:为什么我总会出现"Read-only file system"的错误呢?
A:看看是否忘了设"read only = no"了
Q:为什么我会出现'@ERROR: invalid gid'的错误呢?
A:rsync使用时默认是用uid=nobody;gid=nobody来运行的,如果你的系统不存在nobody组的话,就会出现这样的错误,可以试试gid =
nogroup或者其它
Q:绑定端口873失败是怎么回事?
A:如果你不是以root权限运行这一守护进程的话,因为1024端口以下是特权端口,会出现这样的错误。你可以用--port参数来改变。
Q:为什么我认证失败?
A:从你的命令行看来:
你用的是:
> bash$ rsync -a 144.16.251.213::test test
> Password:
> @ERROR: auth failed on module test
>
> I dont understand this. Can somebody explain as to how to acomplish this.
> All suggestions are welcome.
应该是没有以你的用户名登陆导致的问题,试试rsync -a max@144.16.251.213::test test
四、一些可借鉴的脚本
这里这些脚本都是rsync网站上的例子:
1、每隔七天将数据往中心服务器做增量备份
#!/bin/sh
# This script does personal backups to a rsync backup server. You will end up
# with a 7 day rotating incremental backup. The incrementals will go
# into subdirectories named after the day of the week, and the current
# full backup goes into a directory called "current"
# tridge@linuxcare.com
# directory to backup
BDIR=/home/$USER
# excludes file - this contains a wildcard pattern per line of files to exclude
EXCLUDES=$HOME/cron/excludes
# the name of the backup machine
BSERVER=owl
# your password on the backup server
export RSYNC_PASSWORD=XXXXXX
########################################################################
BACKUPDIR=`date +%A`
OPTS="--force --ignore-errors --delete-excluded --exclude-from=$EXCLUDES
--delete --backup --backup-dir=/$BACKUPDIR -a"
export PATH=$PATH:/bin:/usr/bin:/usr/local/bin
# the following line clears the last weeks incremental directory
[ -d $HOME/emptydir ] || mkdir $HOME/emptydir
rsync --delete -a $HOME/emptydir/ $BSERVER::$USER/$BACKUPDIR/
rmdir $HOME/emptydir
# now the actual transfer
rsync $OPTS $BDIR $BSERVER::$USER/current
2、备份至一个空闲的硬盘
#!/bin/sh
export PATH=/usr/local/bin:/usr/bin:/bin
LIST="rootfs usr data data2"
for d in $LIST; do
mount /backup/$d
rsync -ax --exclude fstab --delete /$d/ /backup/$d/
umount /backup/$d
done
DAY=`date "+%A"`
rsync -a --delete /usr/local/apache /data2/backups/$DAY
rsync -a --delete /data/solid /data2/backups/$DAY
3、对vger.rutgers.edu的cvs树进行镜像
#!/bin/bash
cd /var/www/cvs/vger/
PATH=/usr/local/bin:/usr/freeware/bin:/usr/bin:/bin
RUN=`lps x | grep rsync | grep -v grep | wc -l`
if [ "$RUN" -gt 0 ]; then
echo already running
exit 1
fi
rsync -az vger.rutgers.edu::cvs/CVSROOT/ChangeLog $HOME/ChangeLog
sum1=`sum $HOME/ChangeLog`
sum2=`sum /var/www/cvs/vger/CVSROOT/ChangeLog`
if [ "$sum1" = "$sum2" ]; then
echo nothing to do
exit 0
fi
rsync -az --delete --force vger.rutgers.edu::cvs/ /var/www/cvs/vger/
exit 0
4、利用find的一种巧妙方式
rsync -avR remote:'`find /home -name "*.[ch]"`' /tmp/
可以用这种方法列出需要备份的文件列表——这种方法似乎比较少人用到。
五、参考资料:
1、http://rsync.samba.org/
2、rsync examples
3、rsync FAQ
以上就是【rsync 端口更换(默认873)】的全部内容了,欢迎留言评论进行交流!